My Invensys Journey Ended!!!

Its heavy heart today... close to 8 yrs association with Invensys has ended today. Felt very bad to say 'bye bye' though its my chosen path.I always feel that i should not be emotional with anything except my family, but i cld not stop it today.
Suddeny i felt to myself today that i had great team and im leaving all of them...
Anyways life has to go on... We are living in practical life..so it must go on...
One of the best dialog of the day is .. " Even WiFi at Invensys remembers you". Amazingly when i reached today V Park Orion block where i worked 7+ years and left that place to DLF 4 months back, my iPhone witched to WiFi (which was configured long back) and asked me to enter password. So even WiFi remembers my stint at invensys :)

So left invensys with heavy filled heart.. and my new and most existing journey begins from tomorrow.

5 Rules to Score better among other Apps

5 Rules to Score better among other Apps

Rule #1 - Know your market.
The most successful apps we see are those being published by companies or individuals that really know their market. This is more than just being able to recite some industry statistics. This is knowledge that only comes from years of experience in your field. And with this knowledge comes access to the right contacts that can endorse your app or help get your game trailer on the leading sites.

Rule #2 - Know the difference between a distribution platform and a marketing platform.
It is common to hear of the App Store being referred to as a marketing platform. And, it IS a marketing platform, but only for the top 5% of the apps in the 20 different categories buyers can browse. For the other 95,000 apps it is merely a distribution platform. It provides a billing/digital rights management mechanism for the developer, but that's it. This means you need to plan to market your app until it rises above, at least, 95,000 others to fully reap the benefits of the platform.

Rule #3 - Launch quickly and launch often.
Don't try to jam pack your version 1.0 release with every single feature you can come up with. A better strategy is to launch many apps with smaller feature sets and see what sells. Then you can take advantage of the distribution platform to push future releases of the titles that are performing well to keep your audience hooked. Always listen to user feedback about which features they would like to see added, removed, or what's just plain buggy. More often than not, the end user is the best product manager.

Rule #4 - Utilize the embedded ad networks.
Many of the top free apps on App Store utilize ad networks such as AdMob, Decktrade, or Quattro. If you want to be in the top 5% of App Store, then you need to put your app in front of people that use the top 5% of apps. Target your ads to be featured in other apps that you think your target audience might enjoy. Warning, this can be expensive.

Rule #5 - Have a competitive advantage.
Let's take a look at our partner, Tapulous, for a good example of having a competitive advantage. Tapulous makes amazing games. At the time of this writing they have just released Tap Tap Revenge 3, they have the #1 Top Paid app in App Store, and are sitting at #2 Top Grossing. Very impressive, but it's more than just their amazing game designs that got them to where they are. There are many companies out there making amazing games, but only Tapulous has a deal with Universal Music Group, one of the largest record labels in the industry. Having access to artists like the Black Eyed Peas and the #1 DJ in the world, Tiesto, makes a huge difference to the marketability of an app.
P.S. ref from http://www.seekmobileinteractive.com/5-rules-to-stay-above-the-clutter

iPhone OS 3.1 updates

iPhone OS 3.1 Software Update

This update contains bug fixes and improvements, including the following:

• Genius recommendations for Applications
• iTunes 9 support
- Genius Mixes
- Organize your apps directly in iTunes
- Improved syncing options for music, movies, TV
shows, podcasts and photos
- iTunes U content organization
• Redeem iTunes Gift cards, codes and certificates in the
App Store
• Display available iTunes account credits in the App Store
and iTunes Store
• Browse and download ringtones wirelessly from the
iTunes Store*
• Save video from Mail and MMS into Camera Roll
• Option to "Save as new clip" when trimming a video on
iPhone 3GS
• Better iPhone 3G Wi-Fi performance when Bluetooth is
turned on
• Remotely lock iPhone with a passcode via MobileMe
• Use Voice Control on iPhone 3GS with Bluetooth
headsets
• Paste phone numbers into the Keypad
• Option to use Home button to turn on Accessibility
features on iPhone 3GS
• Warn when visiting fraudulent websites in Safari (anti-
phishing)
• Improved Exchange calendar syncing and invitation
handling
• Fixes issue that caused some app icons to display
incorrectly

Products compatible with this software update:
• iPhone
• iPhone 3G
• iPhone 3GS

* Not available in all regions.

For feature descriptions and complete instructions, see the user guide for your iPhone at:


For more information about iPhone, go to:


To troubleshoot your iPhone, or to view additional support information go to:


For information on the security content of this update, please visit this website:

SCIENTIFIC PREVENTION 0F SWINE FLU USING HOUSEHOLD PRODUCTS

SCIENTIFIC PREVENTION 0F SWINE FLU USING HOUSEHOLD PRODUCTS

Message 1 : TO PREVENT “SWINE FLUE”.

1) Use 1 to 3% Hydrogenperoxide Solution(available in in all chemist shops)
For gargling ( 2 times in a day)
2) Inhale 3% H2O2 (Hydrogenperoxide) 3-4 times a day.
3) Wash hands frequently with 1% Hydrogenperoxide.

Message 2: TO PREVENT “SWINE FLUE”.


1) Inhale food grade Vinegar for 1 second (3-4 times a day)
2) Frequently wash hands with 1% Vinegar (Food grade)
3) Mop floor, doors, windows, tiles, toilet floor with 1% Vinegar.

Message 3: TO PREVENT “SWINE FLUE”.


1) Inhale clove oil for 1 second
2) 2) Chew 1 clove in a day (Specially in a public meetings)

Message 4: TO PREVENT “SWINE FLUE”.


1) Eat Raw Garlic ( 0.1 gms to 0.5 gms) 2 – 3 times in a day.
2) Eat Raw Onion
3) Eat fresh raw Ginger (0.1 gms. To 0.5 gms.) 2 – 3 times in a day.

Message 4 : TO PREVENT “SWINE FLUE”.


1) Drink hot milk with 2 gms of Turmeric ( 2 -3 times in a day)

Message 5 : TO PREVENT “SWINE FLUE”.


1) Consume plenty of Vitamin ‘C’ fruits like Lemon / Amla.
2) Consume L-Lysine (Minimum 500 mg.) ( Ask your doctor for dosage).
3) Drink water about 2 – 3 liter / day.

By Dr. Pramod Moghe, (Retd.) Sr.Scientist.
DOLAS VIDNYAN

CIO vs CTO

One of the questions I always feel like speaking is “what’s the difference between a CIO and a CTO?”
Here is a very good small info which explains....
First.. what they have in common:
In both jobs, a key role is helping technologists understand what the business needs and helping the business understand what the technology can do for them.
Both roles require a strong technologist with a strong grasp of business (kind of a corollary to the last point, but slightly different).
Both should be strategic thinkers.
Both should be excellent leaders.
Now for their differences:
CTO is seen as primarily focused on the top line while the CIO is primarily focused on the bottom line. There’s some cross over, but I think this is a valid distinction.
A CTO is primarily concerned with external products and customers while a CIO is primarily concerned with running the business (internal products and customers).
In an ideal world, the CTO runs the product development organization while the CIO runs the IT organization.
If you have to choose, being a strong technologist is more important for the CTO, while being a good manager is more important for the CIO.
A CIO has to be operational and understand how to build repeatable processes, reliable systems, and the organization to run them. A CTO doesn’t necessarily have to have these skill if backed up by a strong operational person in the role of CIO.
A large technology oriented company (more than a few hundred employees) should have both. There’s too much to do for one person and the thinking can be very different. One of the big problems at Excite\@Home was they never had someone at the “C” level who was looking internally. “IT” was a division (not even a VP slot) inside the larger technology organization. There were four levesl between this director and the CEO. The result was real chaos in the internal systems and operations areas. The CTO was a brilliant technologist, but not very “operational” and consequently, repeatable processes were hard to find.

10 commandments for creating good code

1.- DRY: Don’t repeat yourself.

DRY is usually the easiest principle to understand, but it is quite harder to apply. It means that when finding similar code in two or more places, we should abstract them into a new method and change the previous code fragments so they will now call the new method with the appropriate parameters.

DRY is maybe the most universal coding principle, I have never found a developer who would argue that repeating code is good, but, I have found developers that forget about this principle when coding unit tests, as an example: imagine that you have changed the interface of a class which had lots of unit tests, if you haven’t used DRY, you will have to manually change the call to this class interface to match the new signatures to each test case.

2.- Write short methods.

There are three very good reasons for writing short methods.

  1. Your code will be easier to read.
  2. Your code will be easier to reuse (short methods are likely to produce loose coupling).
  3. Your code will be easier to test.

3.- Use good names for your classes, methods and variables.

There is nothing nicer than using some other developer code and not having to read its documentation because the names of the classes and the methods are telling us everything, so, make everyone’s life easier and take this approach, expend always a few seconds before naming any element in your code.

4.- Assign the right responsibility to each class.

One class, one responsibility, that will sound familiar to those who know about the SOLID principles, but not any responsibility, the right responsibility, so if we have the class Customer, we won’t assign to it the responsibility to create a new sales action, we will just assign it the responsibility to handle all the data related with a customer.

5.- Keep your code organized.

This organization is at two levels.

  • Physical organization: Whatever the structure you are using, packages, namespaces, folders… Organize your classes in such a way that is easy and intuitive to find where the code is stored.
  • Logical organization: Whatever belongs logically together should have access to each other members, but what belongs to a different logic structure has to access them by an interface. These logic groups are commonly implemented as layers, services…

6.- Create lots of unit tests.

The most tests you have, the better, they are our safety net for all the changes we will have to perform in the code in the future.

7.- Refactor often and sooner.

Software development is a continuous discovery process, in order to keep up to date with good code that matches the new/changing requirements is essential to refactor the code as we go. As this is a risky task there are 2 main preconditions to avoid entering new bugs into the system.

  1. Have lots of unit tests.
  2. Do small refactor steps at a time. In software development there are very few things more annoying than start refactoring 2000 lines of code to after 3 hours of work realize that is necessary to roll back to the original version because now nothing works and the track of which change is causing the problem is lost.

8.- Comments are evil.

This particular one is a bit controversial, most of us were taught that comments are good, and actually it’s better to have a comment in an obscure piece of code than just having the code by itself, what this point means is that: even better than having a comment for an obscure piece of code is to not to have that code at all, just refactor it until is a nice and readable piece of code. [EDIT] Please read this other post for a better explanation of what “comments are evil” means.

9.- Code to an interface, not to an implementation.

This is a classic one, coding to an interface will free us from the implementation details, we just define a contract and rely on calling the defined operations on the contract, expecting that the actual implementation will be passed to our code or decided at runtime.

10.- Have code reviews.

We all make mistakes, and there’s nothing better than asking some other person to have a quick and informal review in our code to find them, in order to make the reviews,  it’s better not to wait until the code is completed, it’s better to ask for reviews whenever some important part of the code has been completed or when a few days have passed from the previous review.

Written by Alberto G Posted in Software Development Theory

Microsoft into Robotics

Though its quite sometime(around 8 months) microsoft was seriously into Robotics, i kind of blind towards it.

It has drawn serious attention towards the Robotics stall in techEd 2009. I realized that MS have given wonderful tools and stack to develop Robotic application not only for desktop based, even for WinCE and Mobile interactive.

One can download MS Robotic Development Studio if MSDN subscription exists.

Here are the useful links to kick start using Robotics

http://en.wikipedia.org/wiki/Microsoft_Robotics_Studio

You can download Robotic studio (MSDN subscription) from

https://msdn.microsoft.com/en-us/subscriptions/securedownloads/default.aspx

MSDN resources http://msdn.microsoft.com/en-us/library/bb881626.aspx

Integration with Windows Mobile http://mschnlnine.vo.llnwd.net/d1/ch9/4/1/6/8/5/2/352041_Robotics%20And%20Windows%20Mobile%20-%20US.wmv

Tour

http://www.truveo.com/Microsoft-Robotics-Tour-CCR-VPL-Simulation-Part/id/1180700672

useful read:

http://electronicdesign.com/Articles/Index.cfm?AD=1&ArticleID=16631

Source Control for Agile Development

This paper describes an example of how to handle version control in an agile environment with multiple teams. I'm going to assume that you are familiar with the basic elements of Scrum and XP and task boards. I didn't invent this scheme - it is based on the "mainline model" or "stable trunk pattern". See the references section for more info.

I wrote this paper because I keep bumping into teams that really need something like this. Most teams seem to like the model quite a lot once they understand it. This is also the scheme that we migrated to at the company described in "Scrum and XP from the Trenches". It really helped us develop and release software in a more agile manner. By describing the model in an easy-to-read fashion maybe I won't have to explain it as often over a whiteboard :o)

Note that this is only one pattern among many, not a silver bullet. If you do choose to use this pattern you will probably need to adapt it to match your particular context.

Goals

In an agile environment with multiple teams the version control model needs to achieve the following goals:

  • Fail fast
    • Code conflicts and integration problems should be discovered as soon as possible.
    • Better to fix small problems often than to fix large problems seldom.
  • Always releasable
    • Even after a really bad sprint there should be at least something that is releasable.
  • Simple
    • All team members will be using this scheme every day, so the rules and routines must be clear and simple.

Single page summary (for wall mounting)

If this picture is confusing to you, don’t worry, just read the paper.
If this picture is obvious to you, don’t bother reading the paper.
clip_image001
clip_image002
This summary is also available as a downloadable pdf

The version control pattern

Branch owner & policy

Here's a simple rule.

Rule: Each branch (even the trunk) has an owner and a policy.

Otherwise we get a mess. The policy describes rules for what kind of stuff is allowed to be checked into this branch. The owner is the person responsible for defining and following up the policy.

The "done" concept

When is a user story "done"? More specifically, when your team moves one particular user story into the "done" column on their taskboard, what does that actually mean?
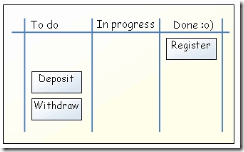
clip_image003

I'll assume the following.

Assumption: Definition of Done = "releasable".

So when a team member says that a story is Done and moves the story card into the Done column, a customer could run into the room at that moment and say "Great! Let's go live now!", and nobody in the team will say "no, but wait".

You can use whatever definition of Done you like. But remember - if the definition is anything less than "releasable" you need to consider: what is not included in Done? And who will do that other stuff? When? And what happens if something goes wrong after Done?

The Done branch

When a story is Done, it needs a home. With my definition of Done ("releasable") that means there must be some branch in the system that you could release from in order to get that story into production. That's the Done branch.

Any branch could be the Done branch. I'm going to use the trunk as the Done branch (a good starting point). Sometimes this is called the "mainline".

Assumption: Trunk is the Done branch.

Trunk policy:

  • Can release at any time
  • Want to release ASAP

"Can release at any time" means just that. At any moment, the product owner can decide that we should make a new production release directly from the tip of the trunk.

Here's an example.

clip_image004

The blue line represents the trunk. Each green ball represents one checkin. So 5 things were checked in during this sprint. We could release from the trunk at any time, although we will typically do it at the end of each sprint. If half the team gets sick near the end of the sprint and they don't have time to finish story #5, we could still make a release. And, of course, we could choose not to make a release and instead wait another sprint to get story #5 in.

"Want to release ASAP" means that we shouldn't check in a story unless we want it to go live (or at least wouldn't mind if it goes live). If story #3 above is something that I don't want to release, I've essentially killed the branch. Since the branch is no longer releasable, I've violated the branch policy.

Rule: Don't combine different release cycles on a single branch

When do we create additional branches?

As seldom as possible. Here's a good rule of thumb.

Recommendation: Only create a new branch when you have something you want to check in, and there is no existing branch that you can use without violating its branch policy.

Work branches

OK, so let's say we have our nice and clean trunk, releasable at any moment.

Wait a sec. Releasable means integration tested. And that means we need to run integration tests. So we need to run integration testsbefore checking in to the trunk.

So where do I check in code that I believe is done, but need to verify before checking in to the trunk? Of course, I could test it locally on my machine, and then check it directly into trunk. But that's a bit scary, I'm sure you've all run into the "hey but it works on my machine" issue.

Another issue is "OK, I'm finished coding for today, I'm going home now. Where do I check in my code? It's not tested yet, so I can't check in to the trunk. I want to check it in somewhere so that other team members can continue working on it" (agile team = collective code ownership right?)

There we go. We have stuff we'd like to check in, and there's no place we can check in without violating a branch policy. That's a valid reason to create a new branch.

Let's call this a work branch, shared by all members of the team. Some people call it a development branch.

Team A work branch policy:

  • Code compiles & builds, all unit tests pass.

clip_image005

Great, so now we have two branches! One stable branch (the trunk) and one slightly less stable branch (the team branch). The team branch is red to highlight that it is less stable, i.e. the stuff on that branch passes the unit tests but it might not be integration tested and might not be stable enough for release. OK, so the now team has a place to check in work in progress!

Hmmmm. What about synchronizing the branches then? Read on.

Publishing from work to trunk

At some point (hopefully) a story will get Done. More specifically, at some point the work branch will get to a point where it is releasable. At that point we can (and should) publish to the trunk, i.e. take all new code on the work branch and copy over to the trunk. After that the trunk and the work branch are identical.

We can call this "publishing" since we have been doing some work and are now ready to "publish" it back to the trunk for release. Just a helpful metaphor.

Here's an example. Let's say we've implemented two stories: Register and Deposit. They are Done, i.e. unit tested, integration tested, and releasable. We have started working on Withdraw, but it is not Done yet. The taskboard would look something like this:
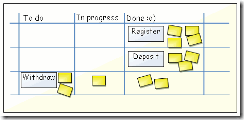
clip_image006

Each yellow stickynote on the board represents a task, i.e. one piece of work needed to complete the story. For example edit class X, update the build script, etc. Each task typically represents about 1 man-day of work, each story typically represents about 3 - 8 man-days of work.

The branch history would look something like this:

clip_image007

So first our team implements Register. Checkin to the work branch, run the integration tests, fix some problems, checkin again, run the tests again, works! Register is Done! Publish it to the trunk.

Next implement Deposit. Only one checkin was needed. Integration tests pass, so we release to trunk again.

Now the team is in the middle of implementing Withdraw. They have done two checkins so far, but aren't done.

Note that "release to trunk" doesn't mean that we are copying the code for one specific story to trunk. It means we are copying everything from work to trunk, i.e. doing a complete synchronization.

So two interesting questions arise:

  1. What if our team implements multiple stories in parallell?
  2. What if other teams are publishing to the trunk as well?

Let's do one at a time.

What if our team implements multiple stories in parallell?

If the team implements one story at a time, publishing to trunk is trivial. As soon as a story is implemented and tested on the work branch we copy everything from work to trunk. Done.

But wait. What if we are doing multiple stories simultaneously within the team? What if Register is done and Deposit is in progress?
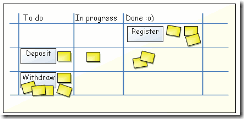
clip_image008

If we synchronize to trunk at this point, we will be including the partially complete Deposit story, which isn't releasable! Violation of trunk policy!.

Of course, we could wait for Deposit to complete.

(waiting...)

OK Deposit is complete now! Great! Wait a sec... now somebody has started working on Withdraw! Ack! Same problem!

clip_image009

If one of the Deposit tests fail it will be hard to know if that is due to the Deposit code or the partially complete Withdraw code that is checked in to the same branch.

Waiting doesn't help. We are rolling a snowball, saving up for a big bang release at some hypothetical point in the future when all stories are complete (if that ever happens).

This is an extremely common problem. So what do we do?

Here are some strategies:

  • Don't do so much parallell development. Try to focus the team on one story at a time.
  • If someone is going to start work on Deposit before Register is complete, wait to check in the Deposit code until Register is complete. Or maybe even check in Deposit on a separate temporary branch if you enjoy juggling branches.
  • If someone is going to start work on Deposit before Register is complete, start with the safe and invisible bits, code changes that aren't going to affect the releasability of the branch. For example if Deposit requires some new code and some modification of existing code, implement the new code now (new methods, new classes, new tests, etc) but not the modifications. If Deposit needs new GUI elements then make them invisible for now. Once Register is complete and released to the trunk we can start implementing the rest of Deposit.

Here's a convenient rule set:

  • Anyone working on the top priority story is King.
  • Everyone else on the team is a Servant.
  • You want to be King. Try to find ways to help out with the top priority story.
  • Whenever a King needs help, Servants immediately offer their services.
  • A Servant may not disrupt a King.
  • A Servant may never check in unreleasable code on the work branch. A King may check in whatever he pleases (as long as he doesn't violate a branch policy of course).
  • As soon as the top priority story is Done, anyone working on the next story is now King.

You might even get a few crowns for the team :o)

On the whole, many teams seem to over-rate the benefits of implementing many stories concurrently. It gives a nice feeling of speed but can be an illusion since it pushes the risky and time consuming bits to the end - merging and integrating and testing.

That's why Scrum teams are supposed to be small (< 9 people) - so that they can collaborate closely and focus their efforts. If everyone does their own story concurrently there probably isn't much collaboration going on. Sure you can have people looking ahead, preparing the next story and doing some of the implementation. But at any given moment the bulk of the team's efforts should be focused on the top priority story.

Multiple teams are a different story. Multiple teams are created when you specifically want to implement multiple stories in parallell. We'll look at that in a moment. First I want to talk a bit about regression testing and diverging code within the team.

Done includes regression testing!

When a story is Done we move it to the Done column and copy from work to trunk. The trunk must always be releasable. This has an important implication.

Rule: Whoever touches the trunk is responsible for ensuring that the whole trunk stays releasable - including all previous functionality!

This rule means, in effect, that testing story A also includes running all relevant regression tests for previously implemented stories. It is not enough that story A works if that code has broken previous stories.

Wait a sec. Isn't that unreasonable? Running all regression tests every time a story is complete?
Well, first of all I didn't say all regressions tests. I said all relevant regression tests. Remember that we had a nice clean releasable trunk as a basis, and now we are just adding one story! That is a fairly small incremental change. If our regression tests are automated we could run them all. But if there are manual regression tests we will have to be selective.
It all boils down to a risk vs cost tradeoff. For each manual regression test we should evaluate the cost of the test (i.e. how much work it is to do the test) vs the likelihood that any important defects will be discovered. And of course weigh in the cost of automating that test :o)

Diverging code (merging conflicts)

What if I'm happily writing code that calls the Widget class. What I don't know is that my team member Jim removed the Widget class one hour ago, in conjunction with a refactoring. So now we have diverging code. I want to discover this as soon as possible, before wasting time writing even more code that calls the Widget class.

Rule: Synchronize your code with the work branch continuously (= as often as possible)

Synchronize in this case means both directions. Merge down the latest from the work branch, and check in your code. The first part can be called "catching up" (= I want to find out what other people have checked in). The second part can be called "publishing" (= I want my changes to be made available to the rest of the team).

Once per hour or so is a good habit, basically whenever you move from one task to another and aren't in the middle of a flow. This is not just about "I want to find out ASAP when someone else writes code that conflicts with mine", it's also about "I want the other guys to find ASAP if I write code that conflicts with theirs". Just remember to not break the policy of the work branch (unit tests pass and whatnot).

This rule may sound rather obvious but bear with me. I want to make this crystal clear since we will be reusing this mindset further down when dealing with multiple teams.

Multiple teams - what if other teams are publishing to the trunk as well?

Let's say we have team A and team B. They are cross functional feature teams working on a flight booking system. Team A is focusing on the booking process, team B is focusing on the backoffice stuff.

Let's say they are going to start a sprint now, with two user stories per team (usually there will be more stories than that in a sprint).
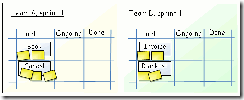
clip_image010

Each team has their own work branch, since they each need somewhere to test their code before publishing to the trunk.

clip_image011

Now we have an interesting problem. Let's say I'm in team A and we have our work branch. Changes might be made in the trunk, without being made in my work branch first! Why? Well because there's another team out there, and they will publish to the trunk whenever they finish a story!

So at any given moment, there may be new code on the trunk that I don't know about. And that code might (god forbid) conflict with my code! Maybe someone in team B renamed the Widget class that I call from my code and... uh... wait a sec. Didn't we just talk about this?

Yep, that's right. It's the same problem. And same solution. But on a slightly different scale.

Rule: Merge from trunk to your work branch every day

clip_image012

Every day when I get to work, someone in my team is responsible for merging the latest version from trunk to our team work branch (= "catching up" with changes made to the trunk).

If my team (team A) discovers a code conflict we resolve it immediately - that's top priority! If we need help from team B (or whoever wrote the code that conflicts with ours) go fetch them and work together to sort it out. The important thing is that my team is responsible for getting the problem sorted out, and that we need to sort it out on our own work branch (not on the trunk).

Rule: Resolve conflicts on the branch that is least stable

Of course, merging from trunk is a waste of time if people don't publish to the trunk on a regular basis. Any divergence between team A and team B is invisible until someone publishes to the trunk. So here's the next rule:

Rule: Merge from your work branch to the trunk on a regular basis, for example whenever a story is done. Don't wait until the end of the sprint!

Note an interesting side effect here:

Side effect: Whoever checks in first wins!

If two teams are writing code that conflicts with each other, the last team to check in has to resolve the conflict. That's a nice side effect, since it encourages teams to check in early :o)

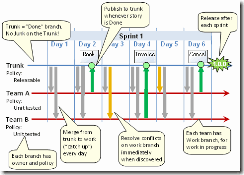
Here's an example of a whole sprint.

clip_image013

We are doing a 6 day sprint with two teams. Team A is planning to implement Book and Cancel. Team B is planning to implement Invoice and Blacklist. Let's look at what happened.

Day

Team A perspective

Team B perspective

Trunk perspective

1

Merge from trunk. Nothing new. Working on Book, checking in on our work branch.

Merge from trunk. Nothing new. Working on Invoice, checking in on our work branch.

Nothing happened today.

2

Merged from trunk. Nothing new. Finished implementing Book. Integration-tested it. Done! Copy to trunk. Start working on Cancel.

Same as yesterday.

Book is now done!

3

Merge from trunk. Nothing new. Still working on Cancel.

Merge from trunk. Aha! There have been changes! Book has been added! Merge with our code in Team B branch, resolve any conflicts. Then keep working on Invoice.

Nothing happened today.

4

Same as yesterday.

Merged from trunk. Nothing new. Finished Invoice. Integration test it (including Book!), copy to trunk. Start working on Blacklist.

Invoice is now done!.

5

Merge from trunk. Aha! There have been changes! Invoice code has been added! Merge with our code in Team A branch, resolve any conflicts. Then keep working on Cancel.

Merged from trunk. Nothing new. Still working on Blacklist.

Nothing happened today.

6

Merged from trunk. Nothing new. Finished Cancel, copy to trunk.

Same as yesterday.

Cancel is now done!

Sprint is done! All stories except Blacklist got done. But that's OK, we can still release! This is because we merged & integrated incrementally. If we wait until the end of the sprint to do this, any diverging code will be discovered at precisely the wrong moment - when we have the least time to fix it.

Release branches

Let's say we've finished sprint 1 and released version 1.0.0 of the system. Now, while we're in the middle of sprint 2, a serious defect is reported on the released version! Oh no! What do we do?

The simplest way is to simply fix it on the trunk and release a version 1.1.0. This means any new stories implemented so far during sprint 2 will be included in the new release. Theoretically this should be fine since the trunk is the Done branch and the definition of Done is "releasable". So whatever is on the trunk at any moment should be something that we want to release.

However there may be reasons not to want to release new stories right now. For example:

  • The fact that there is a serious defect essentially means that the trunk was broken at the time of the release. That in turn means that the sprint 2 stories are built on top of a broken foundation. We might want to fix the foundation itself without having to deal with the new stories as well.
  • Maybe the stakeholders don't want new features to be released in mid-sprint.
  • Maybe it takes a while to make a new release from the trunk, with new features and all, so we want a simple "hotfix" mechanism to get bugfixes out the door faster.

So how do we do it?

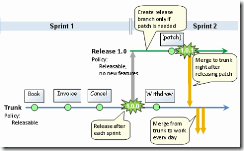
  1. Create a release branch called release 1.0, based on the trunk at the time it was released.
  2. Patch the defect on the release branch.
  3. Merge from release branch to trunk immediately after releasing (so the patch is included in future releases).

clip_image014

Note that we don't have to create the release 1.0 branch when we do release 1.0.0. We can wait until the defect comes up. So we don't need to create a branch until there is something that actually needs to be done on that branch.

The big picture

OK, now I've gone through a fairly detailed example of how to put this pattern to use. Now let's back out a bit and look at the big picture.

In the mainline model, a branch is called a codeline (in fact, branch is considered to be an implementation of a codeline). Sometimes these are called streams.

A codeline's parent (i.e. the codeline that it originated from) is called its baseline. Mainline is the codeline that has no baseline.

So in our examples above we could conclude that:

  • The trunk is our mainline. It has no parent right?
  • All other codelines (release 1.0, team A work, team B work) have the trunk as baseline.

Here's a more complex example:
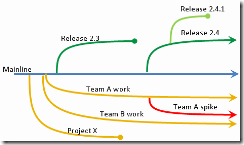
clip_image015

This picture tells us that:

  • The project X codeline was spawned from the mainline. The project is now complete, so the branch is closed.
  • Team A has an active work branch that was spawned from the mainline.
  • Team A also has an ongoing spike that was spawned from the work branch.
  • The release 2.3 branch is closed, since 2.3 is no longer in production and won't be maintained.

Each codeline has a relative firmness level with respect to its baseline, i.e. each codeline is either more firm or less firm (softer) than its baseline.

  • A firm codeline is stable, thoroughly tested, changes seldom, and is close to release.
  • A soft codeline is unstable, barely tested, changes often, and is far from release.

When drawing codelines, firm codelines branch upwards and soft codelines branch downwards. So looking at the picture above, we can conclude that:

  • Release 2.3 is firmer than mainline.
  • Team A work is softer than mainline.
  • Team A spike is softer than team A work.

The drawing format used above is useful for showing branch histories, but it can get a bit messy when there are lots of branches. Here's a cleaner format, showing only the currently existing codelines and where they spawned from.

clip_image016

I suggest drawing a picture of your branches in this format and putting up on the wall in the team room! Really helpful to look at when discussing integration issues.

An important rule is that all change flows along the lines! So no code should be merged directly from team A work to team B work, this will cause all kinds of confusion. Instead, changes in team A work should flow to the mainline and then down to team B work.

Everything above the mainline is a called a release codeline, which means a codeline that is firmer than the mainline.

Everything below the mainline is called a development codeline (or work), which means a codeline that is softer than the mainline.

Golden rule of collaboration:
- Always accept stabilizing changes
- Never impose destabilizing changes

So what does this mean in terms of the different types of codelines?
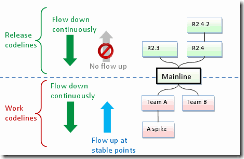
clip_image017

The picture above is just a colorful way of saying that:

  • Whenever a change is made on a release codeline, the change should immediately be merged down to its baseline, all the way down to the mainline.
    • Example: A bug is fixed on R2.4.2. That should immediately be merged down to R2.4, and merged from there down to mainline.
  • A release codeline should never receive changes from its baseline.
    • Example: New code is checked in to the mainline. This should not propagated up to R2.3 and R2.4.
  • Change flows continuously from baselines to development codelines.
    • Example: Any change to the mainline should quickly flow on down to Team A and Team B, and from Team A on down to A spike.
  • Change flows from a development codeline to its baseline only at stable points.
    • Example: Team B merges to mainline only when a story is complete and tested.

Whenever changes have been made to a codeline and its baseline, some kind of merge might be needed. Since code merging is a potentially error prone operation we want to do it on the softer of the two codelines. Once the merge is complete and verified, we can copy the merged code back to the firmer codeline.

Using our convention of drawing firm codelines higher up than soft codelines, we could derive a simple rule:

Rule: Merge down, copy up

Example: Team A notices that the mainline has been updated. They merge the changes down to their development branch and fix any conflicts. As soon as Team A development branch reaches a stable point they copy back up to the mainline. They do of course have to check that nothing else has been changed on the mainline in the meantime.

Variations to the model

The chapter "The version control pattern" describes an example of how to implement the mainline model.

The chapter "The big picture" describes the mainline model in more general terms.

In this chapter I'm going to mention some typical variations on how to implement this pattern.

Definition of Done doesn't have to be "releasable"

Just settle on any definition of Done, and make sure there is a branch to accomodate stories that are Done according to that definition. Be careful about leaving important things out of Done, though. If integration testing is not included in Done, when will you integration test?

Trunk doesn't have to be mainline

You need a mainline for this pattern to work. It doesn't necessarily have to be the trunk though (although the trunk would be a pretty natural choice in most cases).

Teams don't have to have their own branches

You can certainly have multiple teams sharing the same branch, or even working directly off the mainline. As long as you obey the policy of the branch.

Often teams like to have their own branches to avoid having partially complete stories causing interference between teams.

You don't need to create a new release branch each time

You might decide to use the same release branch instead of creating a new one after each sprint. That release branch could be called "currently in production" or something like that. Certainly a useful model if you never have more than one version in production at a time.

You don't need to release after each sprint

You can release after each story. Or after every third sprint. Choose your pace.

You don't have to run regression tests for each story

If regression testing or integration is truly a pain in your environment you may decide to save it to the end of the sprint, so you can batch up a few stories and test/integrate them together. That is your risk to take. If regression testing & integration is included in your definition of done, that simply means you risk getting 0 stories Done if you run into problems with this at the end of the sprint.

FAQ

Where does continuous integration (CI) fit into this?

Which branches should your CI server work on? This is really context dependent, but here is a good starting point.

Assuming that your policy for trunk is "Done & releasable", and your policy for each work branch is "unit tests pass":

  • For each work branch, CI server automatically and continuously checks that it builds and passes all unit tests.
    • Issues a red alert if anything fails. Triggers the smoke machine.
  • For each work branch, CI server automatically and regularly (if not continuously) runs integration tests and regression tests.
    • Displays a discrete warning if anything fails, since this is not part of the branch policy.
    • This test is triggered manually whenever someone is considering to publish code from work to trunk, as a way to check that the story is Done.
  • For the trunk, the CI server automatically and continuously runs integration tests and regression tests.
    • Issues a red alert if anything fails. Triggers the smoke machine, the siren, the USB rocket launcher, and calls in the national guard.

What's the best tool for this version control model?

Not sure. I know it works well with Perforce, I think it works with subversion, but I'm not too sure about CVS. Any input is welcome.

Remember one important thing though - the cost of switching tools is usually quite low compared to the cost of not being able to collaborate effectively! So figure out how you want to work, then find the right tool to support that.

What about checkins that aren't related to a user story?

Not all code changes have to be related to a user story, I just did that in all my examples for clarity. The same model applies no matter what type of code you are checking in (or documents for that matter).

Merging is a pain, so I want to do it as seldom as possible!

Congratudolences, you have mergophobia - the irrational fear of merging code! Merging is a pain because you do it as seldom as possible. The more often you merge, the less painful it is :o)

http://www.infoq.com/articles/agile-version-control

AppStore hits 45k apps

App store hits 45000 apps
Check this
 
one more interesting news
Addwhirl states that apps that are among the top 100 of the free apps section can make $400 - $5.000 a day. This is interesting since it seems that there is less competition in the free apps section, opposed to the paid app section.
 
this is the myth i have till now...why does somebody release an app for free ..it solved now :)

Kindle bigscreen aiming to replace paperbased books and newspapers

This is something i have been waiting for.
Imagine you have a device(not laptop or iphone) with you which u can use it to read ur daily newspaper with the same experiance of them. This is amazing. Need not cut anymore trees :)

an event in New York City this morning, Amazon's CEO, Jeff Bezos, unveiled a larger version of the company's successful Kindle eBook reader. The new device, the Kindle DX, has a 9.7" display that is about two and a half times larger than that of the Kindle 2. The Kindle DX will come with a built-in PDF reader, and features an auto-rotate mode, so that readers can easily switch between reading in portrait and landscape modes. The Kindle DX will cost $489 and is scheduled to ship this summer.


The resolution of the new Kindle's screen is 1200 x 824 at 150ppi, while the Kindle 2 features a 600 x 800 screen. The Kindle DX also feature 4GB of memory.

Textbooks

As we predicted earlier this week, Amazon is aiming this device at the educational market and has reached deals with three major textbook publishers: Pearson, Wiley, and Cengage Learning.

Newspapers

kindle_dx_big.jpgAmazon also announced that the New York Times, Boston Globe, and Washington Post have signed deals with Amazon and that these papers will begin trials with reduced prices for Kindle DX users who agree to long-term subscription commitments later this summer. It looks like these discounts will only be available to users who live in areas where printed versions of these papers are not readily available.

During today's event, the New York Times' chairman, Arthur Sulzberger Jr., argued that the new Kindle finally offers "the same satisfying experience as the reading of a printed newspaper." It remains to be seen, though, if newspaper readers are indeed clamoring for a device that simply copies the experience of reading a traditional, dead-tree newspaper. It is also important to note that Sulzberger called the new deal with Amazon an "experiment," and the success of this experiment will surely also depend on how much of a discount on the Kindle the papers are willing to give to their readers.

Building opensource SAN

Title is very catchy...isnt it. It has to be :), reason imagine SMEs investing in SAN infrastructure. Its huge investment. Lets look into a cost effective way of building a SAN infrastructure using tools like freeNAS,openfiler etc.

What we need here are two server grade boxes with suse server OS.Some SAN setups work with Fibre Channel. Because this involves an expensive fiber optics-based infrastructure, this option is not the best imaginable for an affordable open source SAN. Instead of using Fibre Channel, we'll use iSCSI. An iSCSI target will be used to provide access to the storage device.One of the challenges of building such a flexible SAN setup is to make it as versatile as possible. That means that a failing component has to switch over automatically. So if the SAN box that currently hosts DRBD as well as iSCSI access goes down, the other box in the SAN needs to take over automatically. To do this, we'll use Heartbeat -- a portable, high-availability cluster management program -- to monitor and ensure availability of all critical resources in the SAN.

Required Software
To build such SAN appliances, you need the appropriate software. Typically, any Linux distribution will do, but in this article we'll use SUSE Linux Enterprise Server 10 SP2, which is available as a free download. One of the advantages of using SUSE is its position as the distribution used by the Heartbeat Software developers; Heartbeat plays a critical role in this setup. You'll therefore always be ensured from optimal integration between the operating system and the cluster software when working with SUSE. You could use the open source version of SUSE Linux as well, but to build a stable and reliable setup, I would always recommend working with the enterprise version.

When making your choice of softwares to install, keep it to a minimum. After all, you are building SAN appliances here and typically on a SAN you wouldn't run any services. From the list of installable software patterns, select the following:

  • Server Base System
  • High Availability
  • Documentation
  • GNOME Desktop Environment for Server
  • X Window System

Apart from that, select the iSCSI target components as well. Then you don't need anything else. In fact, you can even do it with less and choose not to select the GNOME environment and X Window System, but since SUSE heavily relies on YaST to configure the box, I'd recommend - at least for as long you are still working on the installation - that you keep the graphical environment at hand. Once finished with the installation, you can still disable it. Of course, you're also free to start all graphical components from a desktop in case you would prefer that.

In addition to the software requirement, you should also think about the hard disk layout you want to use when building SAN appliances like this. No matter if you are setting up server hardware or two laptops to create a test environment, you should take into consideration that a storage device is needed as the SAN storage. In figure 1, I have used /dev/sdb as an example storage device, but this assumes that you have two (or even more) hard drives available. In case you do not have that, it may be a good option to create an LVM setup, and to make a large dedicated volume available for the SAN storage.

The LVM setup also allows you to work with a snapshot appliance - more about that later in this tip. On my test setup, where I use two laptops with a 160 GB hard disk , I've used the following disk layout:

  • /dev/sda1: a 100 MB Ext2 formatted partition that is mounted on /boot.
  • /dev/sda2: the rest of all available disk space, marked as type 8e for use in an LVM environment.
  • /dev/system: the LVM volume group that uses the disk space available from /dev/sda2.
  • /dev/system/root: a 10 GB Ext3 formatted logical volume for use as the root of the server file system.
  • /dev/system/swap: a 2 GB logical volume used as swap space.
  • /dev/system/DRBD: a 100 GB logical volume which is just allocated and not formatted.

To create such a disk layout, use the YaST integrated module while performing the installation.

The last consideration to take when setting up your server is networking. I recommend putting your SAN on a network that is separated from normal user traffic. You don't want synchronization between the storage devices in the DRBD setup to be interrupted by a large file transfer initiated by an end-user, so if possible, create a dedicated storage network.

Normally, you would also want to configure a separated network for Heartbeat traffic, in order that a node won't get cast off the network when traffic is temporarily elevated. In this situation, however, I prefer not to do that. If Heartbeat packets don't come through over the normal network connection, it is likely that your DRBD device has also ceased communicating . You wouldn't want Heartbeat to ignore a failure in the communications link while your SAN is in a disconnected stage because a redundant link is still replying, would you?

You now have the basis of your SAN solution available: the two servers that are going to offer the iSCSI storage services

Disclaimer :Parts of this article are inspired from search enterprise linux.com posted by Sander van Vugt.

Also look at this article below which gives more information on building opensource SAN

http://www.sandervanvugt.nl/files/u18/Creating_an_Open_Source_SAN_Solution.pdf


iPhone 3G ..finally...

Oooo... it took me almost 1 year after launch in india to buy iPhone.
I was happy with Windows Mobile, but i thought why not see whats the big thing in worlds most advanced mobile.I realized it has really got the advanced stuff.
The kind of application you can write using the SDK and hardware components its has got are amazing. Imagine using compoenents like accelerometer components you can write hundreds of earth shaking applications.
Fantastic....

Google Voice

Google aquired GrandCentral and now launching as Google Voice.
This is going to be next big thinghappenning.

windows installer cleanup utility

If your software install is broken/screwed up on your box, here is a cleanup utility.
Windows Installer cleanup utility.
http://support.microsoft.com/kb/290301

Creating first iPhone application - Get Started

An overview about the iPhone SDK

The iPhone SDK was announced officially on March 6, 2008, the first beta release was on July 11, 2008 which demanded a firmware update for all iPhone and iPod users. The SDK continued to develop with time until the Beta3 update to the 2.1 SDK was released on August 8, 2008.

The iPhone SDK package contents

The SDK is broken down to the following:

Cocoa Touch

The Cocoa Touch layer is one of the most important layers in iPhone OS. It comprises the UIKit and Foundation frameworks (UIKit.framework and Foundation.framework), which provide the basic tools and infrastructure you need to implement graphical, event-driven applications in iPhone OS.

It also includes several other frameworks that provide key services for accessing device features, such as the user’s contacts.

This framework is used to implement the core set of features.

  • Application management
  • Graphics and windowing support
  • Event-handling support
  • User interface management
  • Objects representing the standard system views and controls
  • Support for text and web content
  • Accelerometer data
  • The built-in camera (where present)
  • The user’s photo library
  • Device-specific information

Media

The graphics and media technologies in iPhone OS are geared toward creating the best multimedia experience available on a mobile device. More importantly, these technologies were designed to make it easy for you to build good-looking and -sounding applications quickly. The high-level frameworks in iPhone OS make it easy to create advanced graphics and animations quickly, while the low-level frameworks provide you with access to the tools you need to do things exactly the way you want.

  • OpenAL
  • Audio mixing and recording
  • Video playback
  • Image file formats
  • Quatrz
  • Core Animation
  • OpenGL ES

Core Services

The Core Services layer provides the fundamental system services that all applications use. Even if you do not use these technologies directly, every other technology in the system is built on top of them.

  • Networking
  • Embedded SQLite database
  • GeoLocation
  • Threads

OS X Kernel

The Core OS layer encompasses the kernel environment, drivers, and basic interfaces of the operating system. The kernel itself is based on Mach and is responsible for every aspect of the operating system. It manages the virtual memory system, threads, file system, network, and inter-process communication.

The drivers at this layer also provide the interface between the available hardware and the system frameworks that vend hardware features. Access to kernel and drivers is restricted to a limited set of system frameworks and applications. iPhone OS provides a set of interfaces for accessing many low-level features of the operating system.

Your application accesses these features through the LibSystem library. The interfaces are C-based and provide support for the following:

  • Threading (POSIX threads)
  • Networking (BSD sockets)
  • File-system access
  • Standard I/O
  • Bonjour and DNS services
  • Locale information
  • Memory allocation

Develop your first iPhone application:

Things you need before going any further:

  • A “MAC OS X” platform of version 10.5.3 or later. You can get an original MAC box or you can simply get one of the hacked versions of the MAC OS, for more information click here.
  • The iPhone SDK “Software Development Kit” you can get one from the iPhone developer program home page, or simply click here.
  • Xcode, the IDE “Integrated Development Environment” used to develop applications and software for MAC based platforms. Although one of Xcode’s goals is to reduce the time you spend writing code, you still devote a considerable part of your development in the text editor. To that end, the text and source editor provide many features with the aim of making your source-code editing a productive and efficient endeavor. Code folding, code completion, Edit All in Scope, Refactoring, and other features allow you to focus your attention on the right areas and to use your time as efficiently as possible. It’s packed with the iPhone installer, so no need to worry about it.
  • Interface builder, this application lets you design compelling user interfaces graphically. Your work is saved as nib files that your application loads at runtime. This means that you what you design is exactly what users of your application see; you work with the actual controls that iPhone OS places on the users’ screens. It also means that you spend less effort codifying the user-interface–related aspects of your application in source code. It’s also supplied in the SDK package.

Other developing applications you may use:

  • Debugger, as you start testing your application, you may need to step through your code to the cause of unexpected behavior. Xcode’s debugging facilities provide the usual debugging features, such as breakpoints, viewing variables, and so forth. But Xcode provides these and other debugging features right in the text editor. That is, you can make a change in your code, add a breakpoint, start your application, and perform most debugging tasks in the same window.
  • Instruments, as you near the end of the development process, you must ensure your application uses the resources of the device on which it’s running as efficiently as possible, so that battery power is not wasted and your application does not gather system resources unnecessarily. “Instruments” shows your application’s resource usage, including memory, CPU, and network, in a graphical timeline that lets you see how your application behaves over time.

The MVC design pattern:

The structure of iPhone applications is based on the Model-View-Controller (MVC) design pattern because it benefits object-oriented programs in several ways. MVC–based programs tend to be more adaptable to changing requirements—in other words, they are more easily extensible than programs that do not use MVC. Furthermore, the objects in these programs tend to be more reusable and their interfaces tend to be better defined.

In the MVC design pattern, the model layer consists of objects that represent the data your application manages. The objects in this layer should be organized in the way that makes the most sense for the data. External interactions with model objects occur through a well-defined set of interfaces, whose job is to ensure the integrity of the underlying data at all times.

The view layer defines the presentation format and appearance of the application. This layer consists of your application’s windows, views, and controls. The views can be standard system views or custom views you create. You configure these views to display the data from your model objects in an appropriate way. In addition, your view objects need to generate notifications in response to events and user interactions with that data.

The controller layer acts as the bridge between the model and view layers. It receives the notifications generated by the view layer and uses them to make the corresponding changes in the data model. Similarly, if the data in the data layer changes for other reasons (perhaps because of some internal computation loop), it notifies an appropriate controller object, which then updates the views.

Developing the iCalculator application:

Here is a fast overview of what we will do:

  • Creating the project.
  • Implementing the Model Object.
  • Implementing the Controller Object.
  • Implementing the View Object by use of the “Interface Builder”.
  • Customizing the app delegate to incorporate the view controller object, and add it to the application window.
  • Connecting the view controller to its view.
  • Finalizing the application and setting its icon.

Creating the project

1) Launch Xcode. You can find it in the developer folder > Applications > Xcode.

2) Choose File > New Project.

3) Choose from the iPhone OS templates.

4) Choose Window-Based Application.

5) Name your project “iCalculator”.

Figure 1: New Project.


Figure 2: The iCalculator Project.

Note:

iCalculator.app: The application binary, the project’s product. It’s in red because the product hasn’t been built yet.

iCalculatorAppDelegate.h, iCalculatorAppDelegate.m: The files that implement the application’s delegate.

MainWindow.xib: The nib file that defines the application’s main window. Despite its name, iPhone applications normally have only one window.

Implementing the Model Object

We will create a new class whose instance represents an object of the calculator, follow the following steps:

1) Click on the “Classes” folder.

2) Choose File > New File.

3) Choose Cocoa Touch Classes > NSObject subclass.

4) Name the class “iCalculator”, make sure that creating the header file option is selected.

5) Insert the following Code into iCalculator.h:

Figure 3: iCalculator.h.

6) Insert the following Code into iCalculator

Figure 4: iCalculator.m part I.

Notes for newbies:

1) The “retain” and “release” methods are used mainly in the memory management of iPhone applications, that’s because there isn’t any garbage collection in the iPhone OS.

Thus, memory management is done manually; you can’t simply call “dealloc” to free the resources and references of a certain object, because this object may contain references to other objects that will not be de-allocated, and thus will cause memory leaks, so we use retain which will increment the value of a certain variable for this instantiated object, and release decrements the value, and when it reaches zero, the referenced object is de-allocated.

For more information about this topic, read more about memory management in Objective C++ 2.0.

2) If ( Self = [ super init ] )

What does this mean? This means that init of the parent class “NSObject” function will be called and if self is not equals to null do the following.

Figure 5: iCalculator.m part II.

Figure 6: iCalculator.m part III.

Implementing the controller object:

1) Click on classes.

2) Choose File > New File

3) Choose iPhone OS> Cocoa Touch Classes > UIViewController subclass.

4) Name the class “iCalcViewController”.

5) Modify the iCalcViewController.h header file as the following:

Figure 7: iCalcViewController.h

6) Modify the iCalcViewController.m file as the following:

Figure 8: iCalcViewController.m part I.

Figure 9: iCalcViewController.m part II.

Implementing the View Object

To get users excited about your application, it should have the best user interface possible. Interface Builder allows you to build beautiful, more importantly, useful user interfaces by dragging controls from a library of user-interface elements and laying them out n a view as you want them to appear to the user, your user-interface designs are known nib files. Your application loads these resources at runtime to reconstitute the use interface you designed. This means that you can make substantial changes to the user interface layout (and even some behavior) without having to edit source code. This is the main benefit of the Model-View-Controller paradigm.

1) Expand the “Resources” folder.

2) Double click on “mainWindow.xib” and the interface builder will open.

3) From the interface builder choose File > New file.

4) Choose Cocoa Touch and then press on View.

Figure 10: iPhone OS UI templates.

5) Choose save, name it as “CalcView” and navigate till you reach the location of your project and save it under the “Resources” folder and press ok.

6) Xcode will ask you to update the project to accommodate the new file, confirm this process.

7) Press on the File’s Owner icon.

a. Choose Tools > Inspector.

b. Display the identity pane.

c. In the Class text field enter “iCalcViewController”, note that it will auto-complete.

And by this way, we’ve connected between our view object and the controller object.

Figure 11: “calcView”’s Components.

8) Press on the View icon.

a. Choose the Inspector Attribute pane.

b. Customize your view as you desire, here we changed the background’s color to black.

Figure 12: “calcView”’s View designer.

9) Add input and output controls to the view

a. Choose tools > Library.

b. In the organization pane, select Library > Cocoa Touch Plug-in > Inputs & Values.

c. Select the Text Field item and drag it to the View.

Figure 13: Drag and drop components.

d. Resize the text field, by enlarging it, such that it contained by most of the view’s width.

Figure 14: resize text field.

e. Display the Inspector Attribute pane.

f. Set the text field text to 0.

g. Set the alignment to right-align.

h. Set the title typeface and size, by setting the focus on the text field in the view > Choose Fonts, set it to bold and size 36.

Figure 15: Set font.

i. Add a rectangular button.

  • Choose “Round Rect Button” from the library and drag and drop.
  • In the inspector size pane, set the button’s width to 64 and height to 70.

Figure 16: Set font.

  • Connect the button’s “Touch Down” event to the “press:” action method of the “iCalcViewController” class.
  • Select the button in the view
  • Display the Inspector Attributes pane.
  • Set the title color to black.
  • Set the button title to 7.
  • Set the font size to 48.

Figure 17: Set button attributes.

j. Create the button grid:

  • Choose the button from the view.
  • Choose Edit > Duplicate.
  • Position the clone beside the original button.

Figure 18: Clone the button.

  • Select both buttons and do exactly as the previous steps.

Figure 19: Clone the two buttons.

  • Select the four buttons and with the same steps we can generate the following view.
  • But by changing the text of each button and making sure that the action event of each button is the “press” method

Figure 20: The final calculator view.

Editing the application delegate:

1) Double click on the iCalculatorAppDelegate.h to modify it, edit it to look like this:

Figure 21: iCalculatorAppDelegate.h.

2) Double click on the iCalculatorAppDelegate.m to modify it, edit it to look like this:

Figure 22: iCalculatorAppDelegate.m.

Connecting the View controller to the View

As mentioned before, we have connected between the view and the controller, but that was an initial connection.

We have to be more precise, for example we have to mention which controls do certain actions, and which preview certain data, so here is what we have to do:

1. In the CalcView.xib window, select the File’s Owner proxy (which represents an instance of the “CalcViewController” class).

2. In the Inspector Connections pane, connect the displayField outlet to the text field in the view.

Figure 23: Connecting the view with the controller.

3. Connect the view outlet to the view.

4. Save the “CalcView.xib” file.

Note: If you pressed on one of the buttons, you will find that their action event handler is already set, as we set it before during designing the view to the “press” function.

Setting the application icon

1. In Interface Builder, take a snapshot of the Calc button grid:

a) Place the pointer at the top-left corner of the grid.

b) Press Shift-Comand-4 and hold down the mouse button.

c) Drag the pointer to the bottom-right corner of the grid and release the mouse button.

Figure 24: Taking a snapshot.

Mac OS X places the snapshot file in your desktop using the name Picture 1.jpg (or a name with a higher number if you’ve captured other snapshots).

2. Rename the snapshot file, icon.jpg.

3. In the Groups & Files list, select Resources.

4. Choose Project > Add to Project.

5. Navigate to your Desktop directory and choose icon.jpg.

6. In the dialog that appears, ensure the copy option is selected, and click Add.

7. In the Groups & Files list, double-click Resources > Info.plist.

8. In the editor window, set the value of the Icon file key to icon.jpg,

Figure 24:Info.plist.

9. Save the Info.plist file.

Running your application

Build your application and run it on your simulator, if you have an iPhone connected to Xcode you can choose to deploy and run on it.

Please not that, you have to have a developer’s certificate from apple to develop for iPhones, which will cost you $99 or $299 a year depending on what kind of certificate you want, for more details click here.


(courtesy : http://www.datasprings.com/Resources/ArticlesInformation/iPhoneSDKGettingStartedExampleCode/tabid/911/language/en-US/Default.aspx)